This is not just a food blog, but it has plenty of spice

Menu

Skip to content
  • Home
  • About
  • Freebies
  • Projects
  • Recipes
  • Contact

Tag Archives: sister inspirations

Free Printable Christmas Gift Tags {Sister Inspirations}

11 / 14 / 145 / 5 / 15

In an effort to get a jump-start on Christmas, we decided to focus November’s Sister Inspirations on Christmas gift tags. We wanted to design something that would be a great last minute detail but still add a fun finished look to our gifts.

I used three traditional Christmas expressions for my tags, then I designed a red version and a green version of each.

free printable Christmas gift tags // www.alittlenutmeg.com

The phrases I used are “No peeking,” “Jolly Holly-Day” and of course “Merry Christmas.” Feel free to print as many as you like for your own personal use.

free printable Christmas gift tags // www.alittlenutmeg.com

free printable Christmas gift tags // www.alittlenutmeg.com

free printable Christmas gift tags // www.alittlenutmeg.com

free printable Christmas gift tags // www.alittlenutmeg.com

Amy, over at The Happy Tulip, infused her sense of humor into the gift tags she designed by adding famous Christmas movie quotes including my favorite: “Merry Christmas you filthy animal” from Home Alone 2. I do love those movies. Well, the first two anyway. But I digress, seriously check out Amy’s tags because they are adorable and hilarious.

free printable Christmas gift tags // www.alittlenutmeg.com

Leave a comment

Two Coconut Milk Ice Cream Recipes {Sister Inspirations}

10 / 14 / 145 / 5 / 15

Welcome to the October edition of Sister Inspirations!

Amy and I have both recently started to eat a primal/paleo diet with our families, and that became our theme for this month. My mother-in-law bought me the KitchenAid ice cream attachment for my birthday that I’ve been wanting to try out, which gave us an excuse to try our hands at coconut milk ice cream and all the fixins’.

Amy is sharing two delicious homemade chocolate shell recipes and a toffee crumble over at The Happy Tulip. The mint shell pairs really well with my coffee mocha ice cream and I threw the toffee crumble into my snickerdoodle ice cream. The result was fabulous.

If you don’t have an ice cream maker you can just freeze the batter. Using the KitchenAid makes it a little creamier, but I tried both way, and they both were delicious.

Coffee Mocha Ice Cream

Servings: 4

Ingredients

1 can coconut milk
1/4 cup honey
2 tablespoons instant coffee
1 tablespoon vanilla

Directions

Add all ingredients to a blender and blend on medium for 2-3 minutes, until mixture is creamy. 
At this point you can use an ice cream maker and follow their directions. Or you can also pour mixture into a freezer safe container and freeze for 3-4 hours or until desired consistency.

Snickerdoodle Ice Cream with Toffee Crumble

Servings: 4

Ingredients

1 can coconut milk
1/4 cup honey
4 teaspoons molasses
1 tablespoon vanilla
1 teaspoon cinnamon
1/4 teaspoon nutmeg
Amy’s Toffee crumble

Directions

Add all ingredients except the toffee to a blender and blend on medium for 2-3 minutes, until mixture is creamy. 
At this point you can use an ice cream maker and follow their directions. Or you can also pour mixture into a freezer safe container and freeze for 3-4 hours or until desired consistency. Make sure to add the toffee crumble before the ice cream is frozen.

Leave a comment

Two DIY Geometric Concrete Projects {Sister Inspirations}

9 / 26 / 145 / 5 / 15

Hello, friends! We are excited to be back with a Sister Inspirations post again after our long hiatus. This month we have been crushing on lots of geometric objects, so we decided to create our own. We chose concrete for our material because of its great modern, industrial vibe. Concrete is also surprisingly easy to work with and very inexpensive. The mix costs less than $5 and we hardly used much of the bag for our little projects.

We also have the templates for you to download so that you can easily make your own!

Amy designed an adorable hexagon bowl that is perfect for storing small objects like jewelry. I’ve been obsessed with succulents for quite awhile and I’ve been wanting to make a little planter for my coffee table.


You’ll need: 

Quikrete concrete mix, photo paper, packing tape, a printer, scissors, vaseline, and toilet paper roll. We accidentally bought the commercial grade Quikrete, which was completely unnecessary.

Process:

1. Print out the template on photo paper.

2. Cut out and tape up the sides well with packing tape.

3. Coat the inside of the paper with vaseline.

4. Tape off the bottom of the toilet paper roll.

5. Take out any large rock pieces from the concrete mix.

6. Mix the Quikrete with a little bit of water at a time, until you have the consistency of thick pancake batter.

7. Pour concrete into your mold, push the toilet paper down in the mix until you have your desired depth to form the inside of the planter.

8. Let it set until it seems solid but not completely set. Around 18 hours.

9. Peel off the paper, remove toilet paper roll, and continue to let it cure. It should be fully cured after 24 or more hours.

I love the juxtaposition of industrial and natural. You could put a candle in it if you prefer, but I’m in love with the petite planter idea.

Be sure to check out Amy’s gorgeous little geometric bowl over at The Happy Tulip. You can download her template there.

1 Comment

DIY Stocking Stuffers Under $5 {Sister Inspirations}

12 / 5 / 135 / 5 / 15

We’re excited to share with you ten diy stocking stuffer ideas this month, all under $5 each. On this blog you will find five gift ideas for the gentlemen and on Amy’s blog she is sharing five ideas for the ladies.

Personalized Beer Glasses

I am fascinated by the gold leaf paint I bought for this project. Using masking tape as guidelines, I created graphic designs on the glasses. Originally, I wanted to use a stencil to paint words on the glasses, but the gold leaf paint is a little too runny to use with stencils. But, I love how dramatic these turned out. Plus the glasses were each only $1 at our local dollar store so this was super inexpensive to make. The paint was originally $8 but I also got it on sale for $4 at Hobby Lobby. I’m thinking I may add a glass sealer at some point.

Feed Corn Heating Pads

I made these last year for all the boys in the family and it was a hit. The corn pads can be used to heat sore muscles or warm up cold feet and hands. I followed this tutorial but I made a few customizations. I used feed corn instead of rice. I’m sure you can use either, I just prefer the smell and feel of the corn better. I didn’t end up using a lavender essential oils because the corn gives off a pleasant enough smell. I also didn’t feel the need to serge the edges like she does in the original tutorial and the pads held together just fine. I just wanted to simplify the project a little since I am still pretty new to sewing.

Coffee Syrup

This vanilla coffee syrup recipe was so easy to make. I would love the try the raspberry and caramel versions too, but I already had the ingredients for the vanilla syrup in my pantry. So all I bought for this project were the bottles that I found for $2 each at Hobby Lobby.

Peanut Butter Bites

These are so deliciously easy to make. You can find the recipe here. This recipes makes a ton of balls, so you can vary the recipe depending on the amount of people you will be gifting. Again, I had all the ingredients for this recipe on hand so it was super quick to put together.
  

Reindeer Bottles

Last year, I made these with beer for Brandon’s grandpa. He thought they were hilarious. This year, I made these with root beer so they can be a kid-friendly stocking stuffer, as well. Googly eyes, mini craft pom poms, chenille wire and a hot glue gun are the only tools needed for this gift. 
This week on Amy’s blog you will find five more DIY stocking stuffers that will be awesome for all the lovely women in your life.

Leave a comment

8 Thanksgiving Traditions {Sister Inspirations}

11 / 14 / 135 / 5 / 15

With the start of the holiday season, we were obviously inspired by Thanksgiving. Instead of writing about the food or holiday decorations, we wanted to focus on the spirit of thankfulness. So here are eight traditions that you can start with your family this year.


Thanksgiving Journal

Every Thanksgiving, have each member in your family write a note about what they are thankful for during that year. Keep the same journal every year, that way you will have a chronological record of everyone’s thanksgivings.

8 thanksgiving traditions: thanksgiving journal

Kids’ Tablecloth

Lay down butcher paper the length of your kids’ table and let them draw things that they are thankful for. This is a great way to entertain the kids, while getting a glimpse of their perspective. 
An added bonus is that you won’t have to worry about spill-proofing a nice tablecloth. We always did this at our church Thanksgiving dinners and it was one of my favorite things about those potlucks. Besides the food, of course.  
8 thanksgiving traditions: kids' tablecloth

Five Kernels of Corn

This is one tradition that our family has practiced for many years. At each table setting, place five individual kernels of corn. During dinner, go around one by one, and have each person say a thanksgiving per kernel. My family does it so that each person only shares one thing at a time, so you end up going around the table five times. But you could always have each person say all five when it comes to their turn.
The five kernels represent the meager rations of each pilgrim during their first hard winter in Plymouth. The kernels represent the hardships that the pilgrims suffered, but also a reminder to rejoice in the blessings that they did receive. 
The traditional meaning of the first kernel celebrates the Autumn beauty and the harvest it provides. The second kernel reminds us of our love for each other. The third represents our thankfulness for family. The fourth represents friendship and the fifth kernel expresses gratitude for the freedom that the pilgrims found in America.
8 thanksgiving traditions: corn kernels

Random Acts of Gratitude

This list focuses on blessing those people that constantly serve and enrich our lives. Take a little time to express your appreciation and let them know that you notice how hard they work.
  1. Leave a sweet treat for your mail man. Legally, they cannot accept money, or gift cards more than $20, but little things like candy bars are acceptable.
  2. Shovel a neighbor’s driveway
  3. Leave an extra big tip at a regular restaurant or coffee place
  4. Randomly leave a gas card on a coworkers desk
  5. Pay for the car’s order behind you in line at the coffee shop’s drive thru
  6. Give gift cards to your children’s teachers
  7. Deliver a meal to your pastor or another family you want to honor
  8. Send a card with your child to give to their bus driver
  9. Surprise your significant other by doing one of their usual chores
  10. Send you parents a handwritten note expressing your appreciation 
8 thanksgiving traditions: acts of gratitude
The rest of the traditions can be found on Amy’s blog. Click here for the rest of the list. 
Leave a comment

Sister Inspirations: Five Non-Traditional Painted Pumpkins

10 / 21 / 135 / 5 / 15

Welcome to the second installment of Sister Inspirations. This month we felt compelled to take a nod from the season and decorate pumpkins. We realize that there aren’t many new ideas that haven’t been done before, so we put our own flair on a few “non-traditional” pumpkin designs.

We went with painted pumpkins because they last longer and they are not Halloween specific, so you can use them through Thanksgiving. Also, they tend to be more kid-friendly than wielding sharp tools to carve a pumpkin.

I ended up designing a polka-dot glitter pumpkin, a bold crosshatch pumpkin and a white and plum ombre pumpkin.

Glitter Polka Dot Pumpkin

I loved how glamourous this little pumpkin turned out. It makes me happy and smile every time I look at it. It’s such a perfect little pumpkin.

I just bought those little glue dots and stuck them on the pumpkin randomly. After I sprinkled a little glitter over each dot, I patted them down to make sure they stick. You can get glue dots in almost every craft store or places like Target and Walmart.  This polka-dot glitter pumpkin was super easy to make. This design in particular would be a great project for kids.

Crosshatch Patterned Pumpkin

My sister, Amy, and I were getting supplies at Target when I saw this crosshatch pattern on a white flower pot. I instantly thought it would translate gorgeously to a pumpkin.

First, I painted the pumpkin white then I used the end of a small sponge brush to create the pattern.

Ombre Pumpkin

I just love ombre. It’s a trend that I never tire of seeing. Plus it was a good way to inject some bold color into my fall tablescape. 

For this ombre pumpkin, I started with a white base coat, then painted to bottom part plum. I put a second coat of white on the top and while the paint was still slightly wet, I used a damp cotton ball to blend the colors.

Amy also decorated two awesome pumpkins on her blog, The Happy Tulip. Her studded pumpkin is such an edgy little pumpkin. I’m in love with it. Check out her irregular chevron patterned one, as well. They both have pretty dramatic results.

Leave a comment

Sister Inspirations: Boozy Maple Apple Cider with Salted Caramel Whipped Cream

9 / 26 / 135 / 5 / 15

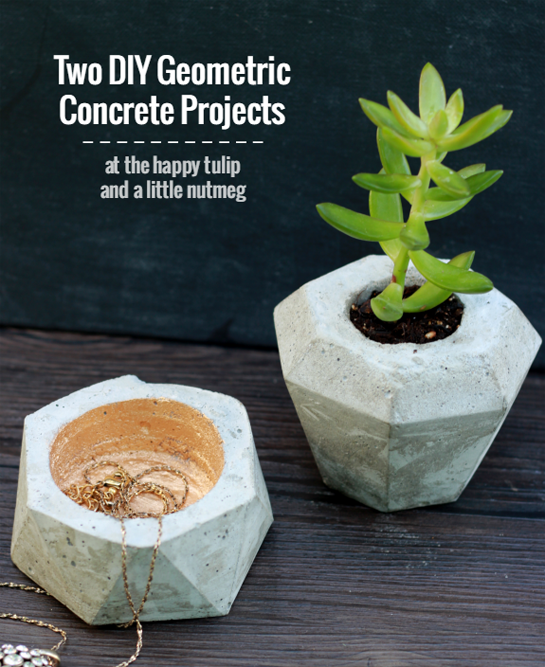
My sister, Amy, started her blog, The Happy Tulip, a few years ago and has been encouraging me to follow suit. I’m glad I finally gave into her persistence.

Amy and I have found that we feed off of each other’s creativity and are often inspired by similar things. We thought it would be fun for us, and hopefully you, if we periodically collaborate with each other. We are hoping that this is a start of a monthly feature on our blogs.
This month the gorgeous weather inspired us to have a camping theme.  This is the ideal time to go camping in our corner of the Midwest because the weather has started to cool down. However, the fall months can get crazy busy and we wanted to make the charm of camping accessible without the hassle of packing. Our favorite part of camping has always been the food. So, this month we created our own spin on classic camping recipes.

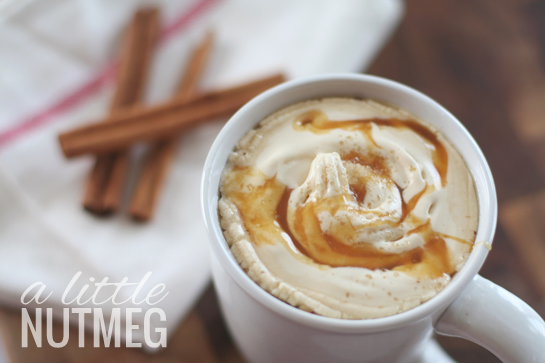
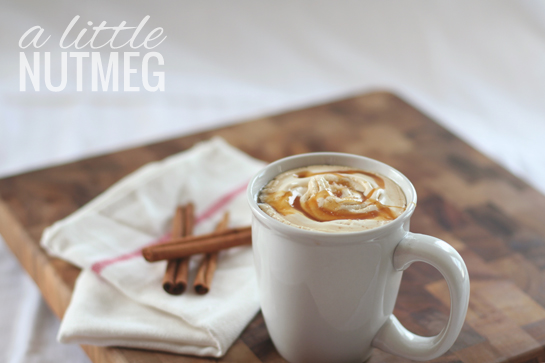
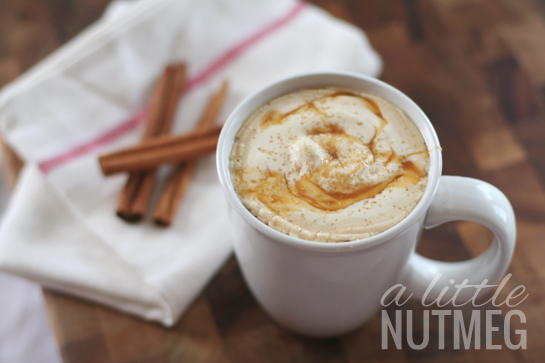
For my portion, I wanted to make a grown up version of apple cider. The magic is in the salted whipped cream. I am a barista at a local coffee shop and the sweet salt that we top some of our drinks with has me mesmerized. It’s such a simple thing, sugar in the raw and coarse salt. But it’s magic.

That was my initial inspiration for the salted caramel whipped cream. Homemade whipped cream is one of my weaknesses. Amy and I were eating it by the spoonful while we were photographing the final product. Believe me, it’s good. Or don’t believe me and try it yourself.

Boozy Maple Apple Cider: Serves 2

16 ounces apple cider
6 ounces maple flavored whiskey (I used Crown Maple)
A pinch of nutmeg
A pinch of clove
A pinch of allspice
Add the apple cider and whiskey to a small pot. Sprinkle in a pinch of nutmeg, clove and allspice and let simmer. Remove from stove before it comes to a boil. Serve topped with salted caramel whipped cream.

Salted Caramel Whipped Cream: Serves 2

1/2 cup heavy whipping cream
3 tablespoons of caramel syrup (I used Hershey’s)
Sugar in the raw (or any turbinado sugar)
Coarse salt
Pour the cream and caramel syrup into your bowl. Beat on medium high until soft peaks form. I used my KitchenAid mixer on setting eight. It helps if the ingredients, the bowl and the paddle are all chilled.
Mix equal parts sugar in the raw and salt. Once you put a dollop of whipped cream on your drink, sprinkle on a little sweet salt to top it off.

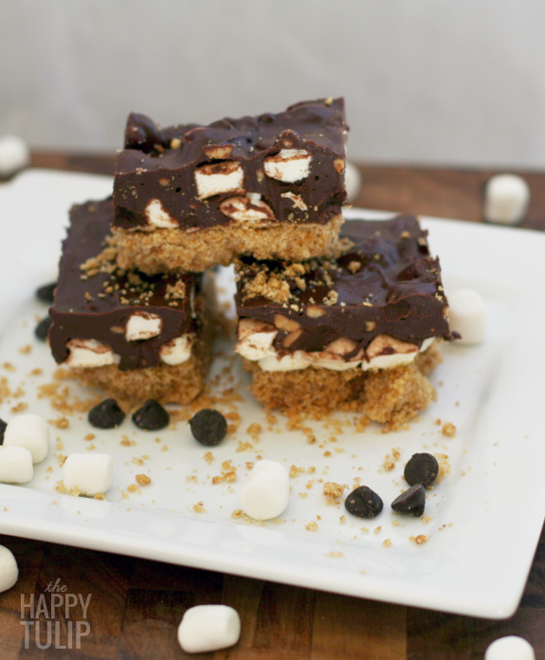
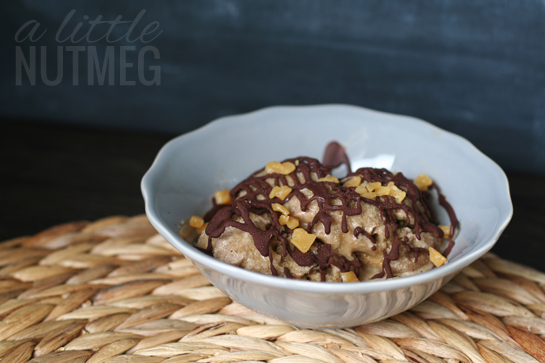
For Amy’s blog she decided to create two s’mores inspired desserts. While we were photographing her finished desserts, the simple ingredients were very easy to eat. I definitely got a sugar buzz. It’s nice to get the s’mores flavor without having to mess with the leftover marshmallow ooze on your fingers. Check our her recipes for her S’mores Bars and S’mores Dipped Marshmallows on her blog, The Happy Tulip. They’re both delicious and so easy to make and eat.

2 Comments
I'm glad you're here!
Facebook profile twitter profile email me email me twitter profile rss feed

Search this blog

Recent Posts

  • Free Valentine’s Day iPhone Wallpaper
  • Top 5 iPhone Wallpapers from 2014
  • Christmas Glitter iPhone Wallpaper
  • Free Printable Christmas Gift Tags {Sister Inspirations}
  • Two Coconut Milk Ice Cream Recipes {Sister Inspirations}

Archives

  • February 2015
  • January 2015
  • December 2014
  • November 2014
  • October 2014
  • September 2014
  • August 2014
  • July 2014
  • June 2014
  • April 2014
  • March 2014
  • February 2014
  • January 2014
  • December 2013
  • November 2013
  • October 2013
  • September 2013
  • August 2013
Site made with ♥ by Angie Makes